Saturday, May 19, 2012

Lippy Stuff

When I was in elementary school and junior high I was completely obsessed with Neopets; which I just looked up and it still exists. The only thing that kept me from logging on and looking around is that the only thing I remember from my username and password is "Lippystuff". I have no idea why I thought that  "lippystuff" {along with my favorite numbers 14 and 27} was a normal password, but I did. It was the best my 13 year old mind could come up with I guess. Or maybe it was foreshadowing just how much lipgloss and lipstick I would own in the future.

Either way, here it is, my promised post about my lippy stuff collection!


{Yes, this is what I do with my free time as I continue to look for a job. Arrange and take pictures of my lipgloss.}

I don't think one person should be allowed to have this much lipgloss. The sad part is, there are probably a rather large handfull of people that have even more than what you see before you.

My Favorites:


As I mentioned in my last post, I am addicted to Sephora lipstick. I've only bought two so far, but they are my daily staples! They are more pricey than drugstore lipsticks, but still not as expensive as some department stores. They wear great throughout the day and only need to be freshened up once or twice if you are eating a lot or biting your lip for one reason or another {you know, cute boy walks by, someone says something derogatory against cats and you have to hold back a rebuttal in order to retain your friendship}.


The Lipstick


The Bath and Body Works Collection.

From the the time I bought my first tube of metha lipgloss at B&BW {pictured at the left end of the top row in all its dirty glory} I have been a firm believer in all of their lines. The best part? I bought that first tube in ninth grade and it still has some juice.

I have no good explanation for the 25 other tubes besides birthdays, Christmas and $3-per-tube sales.


In the end, this collection leads to my lippy stuff box being full to overflowing and hardly being able to fit it on its shelf. And yet I can't bring myself to get rid of any of them. I guess I will forever be a lipgloss pack-rat!

So what's your favorite go-to lipgloss?

I'd love to hear about it!

xoxo
C.R.M.

Thursday, May 17, 2012

Newfound and Nifty

I've found that most blogs have an update that stays constant week to week and I decided to join the band wagon and make one for my own blog. {Maybe it will get me to be more regular in my postings. Ha.}

Inspiration:


I happened upon this Russian designer while blog-hopping and I fell head over heels for her fall 2011 line. {Yes I know it is now summer 2012, but when it comes to vintage clothing, I'd wear it any time of the year.}

Now try not to drool too much as you look at these pics while I get a kleenex to wipe off my chin...


{This one is by far my favorite. Why can't I still have a prom to go to? I would trade this dress for any of the sparkly ones now gathering dust in my closet at home.}


{I have no idea the pricing on any of these pieces, but I'm sure they are all out my range. Now I just need to buy some calico prints to make a full gathered skirt!}


Tunes:


Anyone who knows me, or meets me for the first time and talks to me for five minutes will know that I am completely obsessed with music. I memorize lyrics like crazy and love to belt out my favorites all day every day to the horror joy of my roomies. My current favorites include, but are not at all limited to, the following: 


{I've been checking out Carrie Underwood's new CD on Spotify and I love it! I have yet another CD to add to my birthday/Christmas wish list for this year!}


and last but not least...


Obsession: 

Lipstick. 

Especially anything coral or orangy colored. 

I use to be a lipgloss only type of girl, but lately I have graduated to women's lipwear and I don't think I'll ever go back! {Be watching for a post soon to come about my lipgloss/lipstick collection. I am pretty sure I could never buy another tube for the rest of my life, use up one tube at a time, and never run out.} The fact that I only have to put on a little bit of sparkly eyeshadow, black liner, mascara, and a pop of color on my lips makes getting ready in the morning ten times faster! 

The Fav: I found this gem at Sephora the first time I visited the new shop in City Creek. {Why did I have to discover that I love their make-up so much? I was perfectly content with my four dollar Walmart lipstick until I tried some of theirs.} Now I wear it almost every day!


Projects:


My most resent project has been to finish my first ever digital scrapbook! I ordered the printed book a few days ago and now I am just waiting rather impatiently for the book to show up in the mail!

It took me forever to complete, but I am so proud of it and I hope it prints as well as it looks on my computer screen!


{The book I just completed is of the three Choir Tours I went on during my high school carrer. Such fun times. Above is one of my most resent and favorite pages!}

Well, that's all for today folk and my mom is calling me for dinner! I have loved being at home the past week and having home cooked meals every night that I didn't have to prepare! I'm headed back up to SLC tomorrow as my epic search for a job continues, but I'll miss being home. {And my cat.}

Until next time!

xoxo
C.R.M.

Tuesday, May 15, 2012

Cat Naps

This is what happens when I leave my work station for more than a few minutes...


Too bad she's so cute, I can't even get mad!


xoxo
C.R.M.

...and Maggie

Ruffled Shirt Tutorial


I began making this shirt by using this tutorial...but I ended up taking quite a few deviations. 

My first attempt at finishing off this shirt did not end well. I did the ruffles in a bib shape only on the top...well, it definitely looked like a bib. And a fluffy one at that!

{Sorry I don't have pictures of all the steps, I only decided to make this into a tutorial when the finished product didn't look too wretched!}

Step One: In order to make this shirt, I bought the 3/4 length black shirt to use as the base and a tank top with lace on the bottom and top to cut up and make the ruffles with. {I bought both of these shirts for less than three dollars. If you live in the Salt Lake area, check out the Downeast Outlet Store by Walmart off 1300. Everything in the store is under $10 and you can get super cheap shirts to chop up! It was a bad day for my bank account when I discovered that store!}

Step Two: Cut up the shirt of your choice into strips. I cut mine into 1-2 1/2 inch strips. It just depends on how thick you want your ruffles to be. I snipped the edge of the shirt and ripped rather than taking the time to cut each strip out precisely. 

Step Three: Using a long basting stitch, sew the top edge {long ways} on your fabric strips. Leave the thread ends loose and pull them to gather the strips into ruffles. 

Step Four: Place your ruffles in the design that looks good to you and pin down the top layer. You could work from the bottom up so you don't have to pin back each layer as you go, but I worked from the top to the bottom because I'd rather run out of fabric strips at the bottom rather than the top!


Step Five: Start sewing each layer in place with a stretch stitch {if you are working with knits} by following your basting stitches. Pin back each previous layer as you go so you don't catch it in the next one. Continue in this fashion until you have reached your desired number of layers/ruffles down the center front of the base shirt. 


Step Six: To finish off the top, I did a ruffled flower. I accomplished this by spiraling the ruffled strips until it was full enough. I started on the outside and worked my way in. 

And...Voila! A brand new shirt with some pazazz! 

{Disregard my gross hair and tired eyes in these pictures!}


Some ideas for the next time I do this project:

1: Make the ruffles a little smaller and closer together so the bib idea could actually work. It also wouldn't have looked as fluffy if the ruffles had been out of the same color as the base shirt.

2: Cut the shirt down the middle and make it into a cardigan! My roommate Katie gave me this idea and I think it would look super cute. It would make the ruffles less bold and be more versatile in mixing and matching in different outfits. 

Good luck with your ruffling and let me know what you think!

xoxo
C.R.M.

Monday, May 14, 2012

Taking in Jeans Tutorial

You know what I have always hated? The way that the back of my jeans always pooch out and never lay flat against my back. For some reason my curvy shape doesn't like the fit of the waist band of store bought jeans and I really don't want to undertake the project of making my own. Way too much work when I can find jeans on sale for ten dollars or less {usually}. 

The other thing I hate is wearing belts to fix this problem. This usually leads to the belt riding up and the back of my jeans still pooching out the back. 

So I figured I had two options: 1: Constantly be looking like a fool with my pants on the ground (or at least look like a fool pulling them up every few minutes) or 2: Find a way to fix them.

I went with option number 2. 


Here is the unsightly look of my pants before I took them in. 
{This picture was also very awkwardly taken by looking at a mirror to get the position right while holding up my shirt and trying not to give you all a peep show of my underwear. I'm sure it was quite the show!}


Step One: Put on your jeans and pinch the area between the center belt loop and the side belt loop on either side of the center. You can pin this pinch {or have someone help you pin it} or just eyeball it like I did. Usually I end up taking my pants in about 1/2 and inch on either side. Get too much more than that and your pants will start to pucker funny and they won't lay flat once they are sewn. 


Step Two: Take your pants off {and make sure to replace them with others-or brightly patterned pj pants like me} and find the center point between the middle and side belt loops. If you are taking in pants without belt loops, then fold your pants in 4ths to find all the points you will need to take in your pants. 


Step Three: Match up the belt loops with right sides together. Make sure the top edge is even and if you really want to be precise, that the bottom of the waistband is even too. 


Step Four: Once you have the belt loops and top edge lined up, pull the waistband tight and determine how much you want to take in. You can pin this or once again, eyeball it like I did. 


Step Five: Now it's time to start sewing your dart! {Make sure you are using a jean or heavy duty sewing machine needle.} Sew from the top at your desired width of the dart down diagonally to the decorative seam that is one most jeans along the backside an inch or so down from the waistband. Make sure to backstitch at the beginning and the end of your stich line. 


{Here is a better picture of the spot your dart should be tapering to-the yellow stitching at the bottom of the picture.}


Step Six: You now have a completed dart! Repeat steps 2-5 on the other side of the back of your pants.


{Another example of what the dart should look like.}


This is what the outside of your pants will look like. As you cans see, I wasn't as careful as I could have been with lining up the waistband, but I don't usually tuck in my shirts, so I didn't take the time to be precise. It will also look flatter if iron or even after washing a few times. 


The finished product! I have done this to almost all of the jeans that I own and for those of you who are belt haters {at least for belts that are used as something other than an accessory} I would recommending trying this out! 

{*Note: I don't cut the excess fabric off of my darts just in case I need to take them out at a later date. If your darts aren't too large, they shouldn't affect the way your pants wear or be too bulky and awkward.}


It was hard to get a good picture that didn't make my butt look huge, so this is the best I could do! :) 

Happy Sewing!

xoxo
C.R.M.


Vlog (aka Movie Time)


I finally got the video I made for my Writing for New Media class (also the class I started this blog for) to upload onto my blog! Enjoy! :)

xoxo
C.R.M.

Refashion: Skinny Jeans

I have been trying to figure out what to blog about next and I have had lots of ideas, but no time to actually make them fruitful. But now with school being out and no job in sight, I have a lot of empty time on my hands. Instead of continuing to waste it away, I have decided to try my hand at some tutorials of the projects I have been doing lately. I've never tried this before, so let me know if anything is unclear or you have any questions. Well, here it goes!...

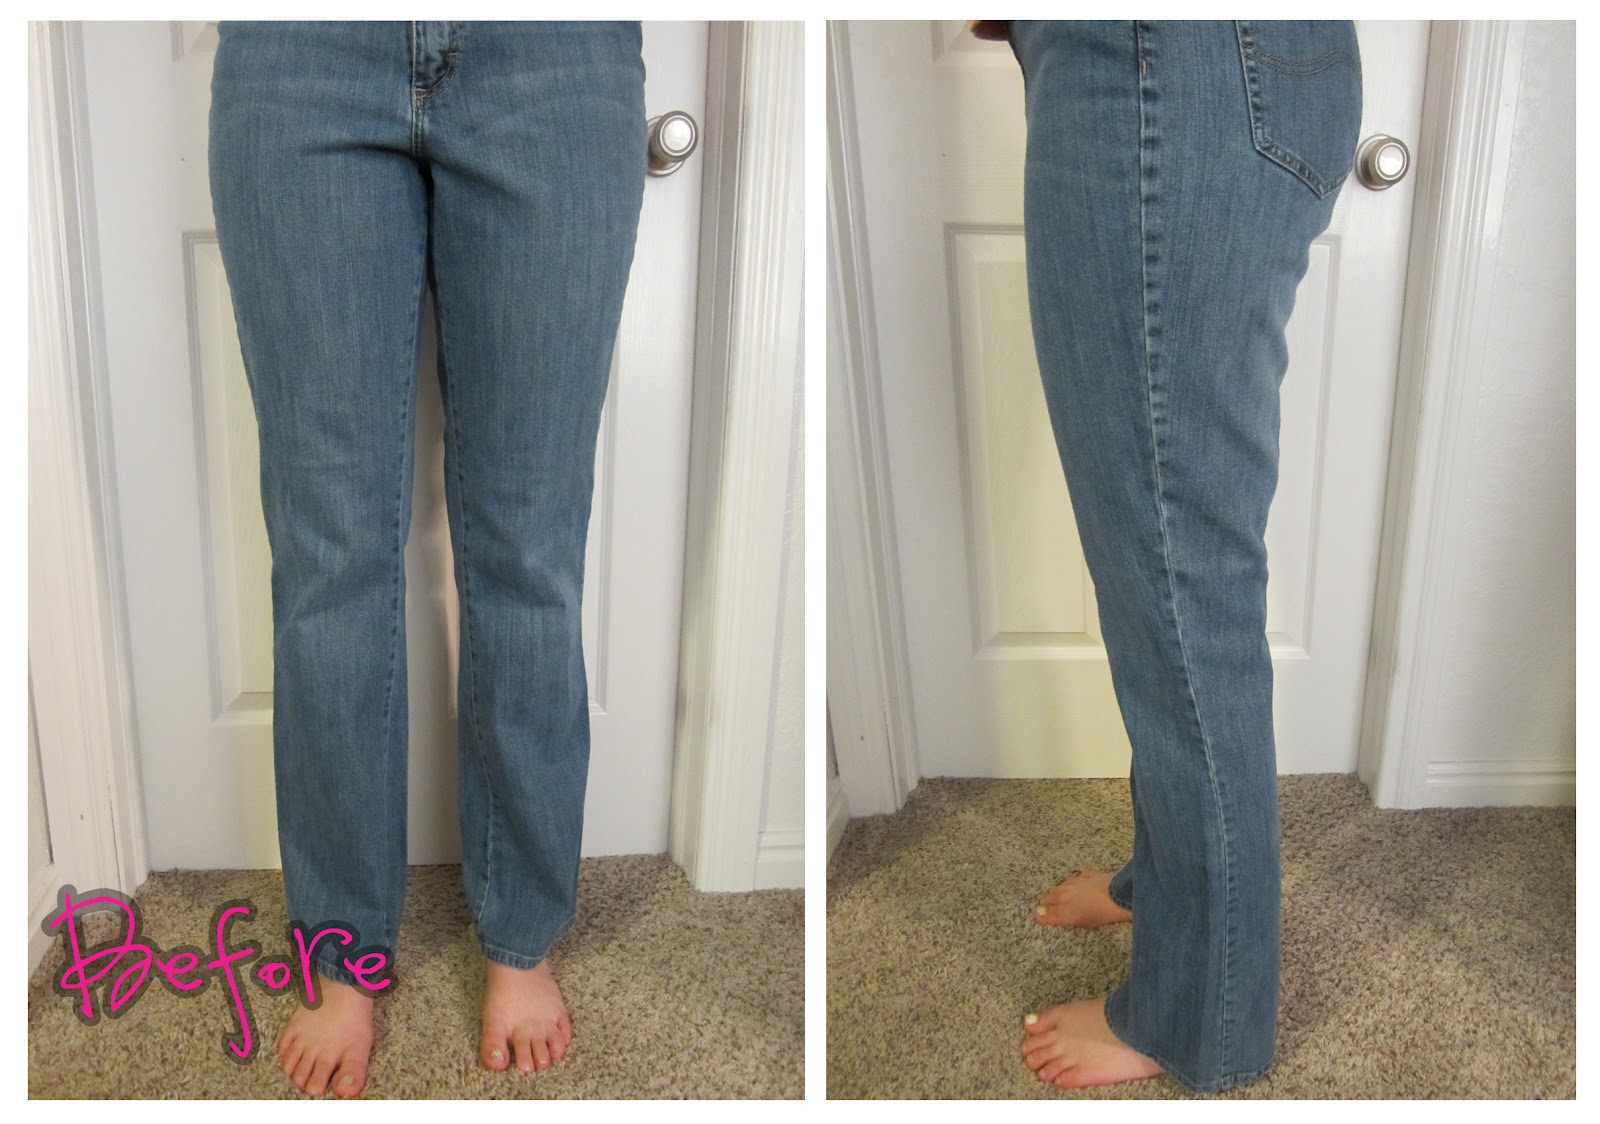
My little sister has always had the problem of finding skinny jeans that fit her. She is a very tall girl, so they are usually too short. So why not take old flare jeans and fix them up? 


{I ended up doing a couple of pairs of jeans for my sister, so the pictures are from multiple fixes--hence the different shades of jean.}


Step One: Put on your jeans inside out and pinch the sides to your leg to how skinny you want them. Only do this to one leg of your jeans for now. Just make sure it feels comfortable! 

One thing you might want to consider is whether or not your jeans have a decorative or thicker seam on the outside or inside edge. If this is so, only take in the side that does not have the decorative edge. If you take in the decorative edge side, you will be able to see where your stitching ends and the original seam starts and you won't have as clean of a finish. 

{*Note: The pinning is a whole lot easier to do with someone else's help! I have also seen this part done by laying a pair of skinny jeans on top of the ones you want to fix and pinning along the edges, but I found this method to be unreliable and harder to get a perfect fit.}

Once one leg is pinned, carefully take off your jeans, no one likes to get poked!


Step Two: Before you start sewing your jeans, make sure to get a jean or heavy duty needle for your sewing machine. A regular needle might still work, but it will be harder to sew through the thicker parts of the fabric and you might get your machine jammed or break a needle. 

Once you have your new needle, starts sewing the sides of your jeans where you pinned them. Make sure you pull the fabric tight against the original seam and that the fabric lays flat. 


Your finished stitching should look something like the above pictures depending on how tapered you want the leg to be. Turn your pants inside out and try them on to make sure you like the fit of the pant leg. If you need to make any adjustments, do so now because your first leg will become the templete for the other leg. 


Step Three: Once you have one leg sewed up to your liking, line it up with the other pant leg with the outside seam. Make sure it lies flat and that the bottom of the pant leg matches up. 

{*Note: This works best if you work one side of the pant leg at a time because there will be some bulk in the middle that will not lie flat if you line up both sides at the same time.}


Step Four: Once you have the pant legs lined up, pull back the stitched side to reveal the unaltered side and pin it to match up with the other leg. Do this up and down each side of the pant leg. Now you are ready to stitch up the other pant leg like you did the first. 

Once both legs are stitched up, try on your pants right side out and determine if both legs feel the same in tightness. If not, fix any problem areas and try them on again. 


Step Five: When you are satisfied with the fit of both pant legs, finish off your seams with a zig zag stitch and cut off the excess fabric or serge the edge to keep the fabric from fraying too much in the wash. 


Step Six: Enjoy your new pair of custom fitted skinny jeans! This tested method has worked wonders for three pairs of my sisters pants and one pair of thrifted colored jeans I found at Savers that needed some love as well. {Sorry I don't have a before picture. I'll be better next time!}


Well, I hope this tutorial was helpful and that you have lots of success in your skinny jean making endeavors! Hopefully this will be the first of many tutorials and DIY projects from the meanderings of my bored to death mind! :)

xoxo
C.R.M.