Thursday, May 31, 2012

Newfound and Nifty

Wow. I can't believe it is already Thursday again and time for my weekly post. I really need to get into the habit of posting more often. But with my new job starting today, I have a feeling my time is going to be very short!

Inspiration:


I saw this picture on someone's blog and I must say I fell in love. Maybe it's my obsession with old lady activities {like wearing curlers} or maybe it's just the vintage meets modern vibe that is in all the magazines and stores lately. Two of my favorite things in one. Fabulous. 

Tunes: 


I was choosing a song for my morning alarm last night and this one came to mind. {Maybe it was because I knew I was going to have to wake up early and wish that I was dead. :p } It's so beautiful and so is the animation in this video. BYU definitely got it right on this one. 

Obsession: 

This summer has been a summer of social engagements. This is completely opposite to last summer, though it was great, it was definitely lacking in the socializing category. One of these oh so exciting engagement I have been taking part in is commonly known as Ultimate Frisbee. 


I might not be quite as intense as these guys {though I wouldn't mind some stripped socks like} but I can hold my own. I don't know what my abhorrence to it was in high school, but I regret it now that I am completely, well, obsessed. :)

 Projects:

Sadly I really don't have any projects going on right now. I blame my newfound employment. And honestly I'll take it over a pile of half finished projects any day!

Well, sorry this is so short and not that exciting. But I'm not feeling too exciting today. More like exhausted and not looking forward to waking up at 6:00am tomorrow for a meeting before work. Bleh. 

Here's hoping you can sleep in longer than me!

xoxo
C.R.M.

Wednesday, May 30, 2012

The One-Yard Shirt

I have been trying to get this tutorial up for over a week now but just haven't made the time to actually sit down and type it out. But here it finally is and I hope you like it!

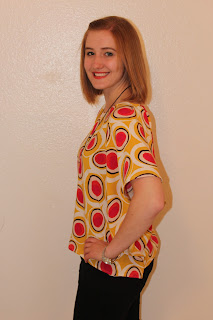
The One-Yard Shirt

You know when you find some crazy awesome fabric while browsing through the aisles at Joanns but it's just a little too bright or garish for a dress or a skirt? Or when you have a random yard leftover from a pervious project and you just don't know what to do with it? Well have no fear! I have the solution and it's as easy as pie. {Though I'm not sure making a pie is actually that easy. Sounds pretty hard to me. Maybe I should rephrase that to say "as easy as eating pie"...}


{Thanks to Heather my roomie for taking pics of me! Check out her blog here.}
{Outfit: Shirt: hand-made, Necklace: Claires (bought forever and a day ago), Pants: Old Navy, Watch: Anne Klien.}

Step One: Choose a piece of fabric that is about a yard long. It could be a bit less or a bit more depending on what size you are and how flowy you want the sleeves to be. Make sure you wash your fabric before you start sewing with it to ensure there won't be any shrinking, stretching or pulling once you sew it. 

{I fell in love with this fabric as soon as I glimpsed it. I thought this was the perfect project for it's bold pattern and colors.}

Step Two: Before you start cutting or pinning, I found the easiest thing to do first {after ironing of course} is to hem all the raw edges. Lay out your fabric matching selvages and edges to make sure everything is even and cut away any excess. Then plug in your sewing machine and hem away! {I did a small rolled hem, but you could do any type you like.}

*Note: If you are using a stretch knit fabric you don't need to do a hem because it won't fray in the wash! Lucky you!


Step Three: Find a T-shirt that you like the fit of and lay it out on top of your fabric. {The neck of the shirt should be on the side of the fold and the bottom should be along the open end.} You will use this as a base for where to sew up the sides and how wide you want the neckline to be. 


Step Four: Mark about an inch or so away from the edge of the T-shirt with pins. {Make sure the botom and sides of your fabric are even.} Mark from the bottom of the shirt to the bottom of the armpit. This will be your stitching line. You can eyeball the distance from each side or you can measure it out with a tape measure if you want to be more precise. I used a tape measure just so that one flowy sleeve wouldn't be bigger than the other. 

Step Five: Mark the middle of the top folded edge of the fabric with a pin and do the same with the neckline of your T-shirt. {I used a different shirt for the body and the neckline because I wanted a round neckline, not a v-neck.}


Step Six: Cut through both layers of fabric to create the back neckline of your shirt. If you want to have more of a boat neck, you could cut the front and back necklines the same, just making them wider and lower. This step really just depends on how you want your shirt to fit. I cut the back to one level and the front to another.


Step Seven: It is hard to cut the front using any sort of templete because you don't want to cut through the back of the shirt. So I just moved my templete shirt and eye balled the front neckline, trying to make it even on both sides. 


Step Eight: Before you sew the sides up along your pins, it might be a good idea to try on your shirt. But be careful not to get impaled with pins or rip your fabric in the process! This will help you know if you made your stitching lines far enough apart so it fits your torso how you like it. This will also help you see how well the neckline you cut out is going to fit and if you need to make any adjustments. Speaking from experience it is better to make your neckline smaller than you think you need it-account for a rolled hem and the nature of your fabric {stiff, flowy, stretchy}. 

Step Nine: Once you are happy with the fit of your shirt, sew up the sides with wrong sides together along your pins {backstitching at the beginning and the end} and hem the neckline. I found that to avoid puckering or bulk in the hem of the neckline, it was better to pin it before sewing. 


{I tried to make the stitching line a little more visible on photoshop since I was using white thread and it wan't visible at all.}

Step Ten: Once I was finished stitching up the sides and the neck of my shirt I realized the neckline was a little bit wider than I was comfortable with. So I decided to put in a pleat on each of the shoulders and it ended up looking really good! I took it in from the middle of each shoulder about an inch.


Well that's all I have for you folks! This is a really fast and fun shirt that could be end up becoming a new staple in my wardrobe in lots of different patterns. My roomies already have me lined up to make some for them too! :)

Happy Sewing!


xoxo
C.R.M.


Up, Up, Up From Here

Hello everyone! I hope you all had a smashingly good memorial weekend and are now getting ready to get back into the grind of life and the play of summer!

My weekend consisted of an outside movie party in Springville with old friends and my roomie {the girl talk was exceptional as was the company}, had my last shift until the fall at the School of Music {I helped at a recital where all the men and women wore an awful lot of cologne and perfume. Gag me.}, enjoyed a peaceful Sunday, made a Joanns run, started sewing a dress {which I will hopefully finish and photograph today} and had a hit of a fire party where double the amount of people showed up then were expected to attend {we felt very popular indeed}.

I must admit that life is looking good right about now. Things seem to be falling into place and I am continually scratching things off my summer bucket list. So many great things have happened in the past few days I feel like they deserve to be put into list form: 

1: I FOUND A JOB! I have been lamenting the fact that I had yet to find a job to everyone and their dog lately and I'm sure those people are even more excited than I am that I finally found one. It took three interviews, the offer of dropping one of my classes in the fall and a scary "hands-on" experience answering telephones and emails to get it, but I have it and it's gonna be great. {On Friday my second day on the job, they are throwing a going away party for a couple of people and we are playing lazer tag in the warehouse. Yep that's right, my bosses are cooler than yours.} I feel like I need to buy some new glasses with my first paycheck to go with my new receptionist title. Or groceries. Groceries would be good.  
2: I finally got a new phone to replace my dying Blackberry. Now dont' get me wrong, I loved my Blackberry for the two years I had it. It was a great phone, got me hooked to having internet access all the time and took the beatings I lashed out on it more then once as it cascaded to the ground. But Blacky was getting old and a bit senile and forgot that in order to function I had to be able to actually push the buttons to have it work and not freeze on me. So Blacky is now residing in my "random stuff" box and my new friend Evo has come to play!


Ain't she a beaut? I have been having way too much fun messing around with the applications, signing up for Instagram {and suddenly feeling the urge to take pictures of anything and everything} and getting use to this newfangled touch screen. I think Evo and I are going to get along just fine.


 {One of the aforementioned Instagram photos. Now the background on my phone. Booya.}

3: I rode a scooter for the first time. And no I don't mean one of those razor scooters you see freshman riding around on through campus, I mean a vroom vroom wind rushing through your hair, feel like you're going to crash and die any second kind of scooter. And I loved it. I think there is a daredevil in me just waiting to be set free! I can finally understand why people would ever want to own a motorcycle. There is just something about being in the complete open and getting your wind whipped beneath your helmet that makes you feel free! {While still being completely terrified of crashing and holding onto the boy in front of you for dear life of course.}

4: My first digital scrapbook came in the mail yesterday and it is so beautiful! I have been staring at the pages on the computer for almost two years now and to see them finally in print is quite the accomplishment. I was also amazed at how skinny the book is. I think it has at least 45 pages, but it is a 20th of the size {maybe that is a bit of an exaggeration, but only a bit} of the regular scrapbooks I have at home. {Which now are up to 7 or 8 in quantity. I have no idea where I am going to store them later in life.}


5: Luke and Lorelai FINALLY got engaged at the end of Season 5 of Gilmore Girls. I about had a fit when I realized the sixth season was nowhere to be found in the apartment and I was going to have to wait until my roommate got back from vacation to watch it. I am completely addicted and I don't know what I'm going to do once I finish the 7th season. But I'm guessing the whole having a job and working 9-5 thing will probably help a little bit. 

Well there you have it folks. An update on the not so exciting, but getting more exciting everyday life of Chelsea.  All I've got to say is I hope it continues to look up up up from here! {If you got that Shania Twain song reference I commend you and we should be friends.}

xoxo
C.R.M.

Thursday, May 24, 2012

Newfound and Nifty

So I realize there has only been one post between last weeks "Newfound and Nifty" and this weeks...but what can I say? The job hunt has taken up most of my time and honestly nothing very exciting has been happening around these parts for awhile now. I guess it might be time to shake things up a bit. :)

But until then, here are some musings for your enjoyment!

Inspiration:


A bunch of blogs that I love got together and had a Button Up Refashion Swap event. I got so many great ideas on how to refashion old guy's button up shirts that I had to make a DI run to snatch some up to cut apart. Seeing as how my laundry bag is full to overflowing and my newly thrifted shirts are somewhere at the bottom being squished into little shirt pancakes, I have yet to actually go through with any of my ideas...but soon. Very soon. 


{I really want to try this one, but first I need some fabric paint!}


{This one is is also adorable. I'm in love with the peplum on the bottom and the light teal dye...it really needs to be time for me to get over my fabric dye phobia...}

And look at how awesome this shirt is that found I at the DownEast Outfitters Outlet store? I'm so excited to make it into something wearable! {Though part of me would love to give it to a guy and actually make him wear it in public. ;) }


{Gotta love the white accents.} 


{And yes, those aren't polka-dots. They're stars. Oh yeah. Can you say red skinny jeans and Fourth of July?}

Tunes: 

Now that summertime is in full swing, I can't help but love any song that keeps me rockin' in my car with the windows down and the wind tangling my hair. {I am totally a windows girl. I'll take all the windows down over air conditioning any day...okay, maybe not a day that's ranging in the 100's. I owe my obsession with wind tossed rides to my first car in high school: Screech. He didn't have airconditioning, so it was windows ALL the time. No matter what. Now it's just stuck!}


{I've loved this song since the first time I heard it last summer. Definitely my summer anthem!}


{One of my good friends introduced me to this song awhile back and I can't tell you how many times I've listened to it since. Really hits home if you know what I mean.}


{I had totally forgotten about this song until my little brother put it on our Brother/Sister Roadtrip CD last week. Amazingly enough I still remembered all the words and of course still love Maroon 5.}

Obsession: 

I have come to find that everyone seems to be obsessed with sushi. I tried real sushi for the first time last week and took the plunge headfirst-none of this California Roll for first time goers for me! I ended up enjoying it a lot more than I thought I would, but I still don't really see the obsession. It was good, but I doubt I will ever crave it and HAVE to have it. But just to prove my "everyone is obsessed" theory, I was invited to go get some again after playing ultimate frisbee last night. Apparently Utahan's like their sushi!


Projects:

Today my goal is to actually start working on some of the sewing projects that are beginning to spill out from their bags/boxes under my bed. I think my first item of business is going to be refashioning this little gem of a dress. I found it {once again} at the DownEast Outlet for $2.50. Unfortunately it is a size 6 {I don't remember the last time I was a size 6...if I ever was...} and the zipper is completely shot. So why did I buy it you might ask? It sounds completely useless and not worth the $2.50 that could have been used for two Redbox movies instead. I have one word for you:

Elephants. 


Yes. This dress is made with elephant fabric. I couldn't resist. I have great plans of making it into a skirt with a black button placket insert in the front. Hopefully pictures of that refashion will be headed your way soon! 


{It really is too bad the dress is too small and broken because it's cute the way it is-paired with a cardigan of course. But alas. I will just have to work my magic!}

In the meantime, enjoy your summer, live life and don't let the little moments of happiness escape from you. I've found that even though the past few months have been stressful and emotionally draining and the last few weeks on the job hunt have been frustrating and unfruitful, I have a great life and have so much to be thankful for. So take a step back and just enjoy life every once in awhile! Let all the stress slide off your shoulders and enjoy a sunset or the sound of rain on the pavement or birds chirping in the tress. I promise it will do you some good! 

Till next time...

xoxo
C.R.M.


Saturday, May 19, 2012

Lippy Stuff

When I was in elementary school and junior high I was completely obsessed with Neopets; which I just looked up and it still exists. The only thing that kept me from logging on and looking around is that the only thing I remember from my username and password is "Lippystuff". I have no idea why I thought that  "lippystuff" {along with my favorite numbers 14 and 27} was a normal password, but I did. It was the best my 13 year old mind could come up with I guess. Or maybe it was foreshadowing just how much lipgloss and lipstick I would own in the future.

Either way, here it is, my promised post about my lippy stuff collection!


{Yes, this is what I do with my free time as I continue to look for a job. Arrange and take pictures of my lipgloss.}

I don't think one person should be allowed to have this much lipgloss. The sad part is, there are probably a rather large handfull of people that have even more than what you see before you.

My Favorites:


As I mentioned in my last post, I am addicted to Sephora lipstick. I've only bought two so far, but they are my daily staples! They are more pricey than drugstore lipsticks, but still not as expensive as some department stores. They wear great throughout the day and only need to be freshened up once or twice if you are eating a lot or biting your lip for one reason or another {you know, cute boy walks by, someone says something derogatory against cats and you have to hold back a rebuttal in order to retain your friendship}.


The Lipstick


The Bath and Body Works Collection.

From the the time I bought my first tube of metha lipgloss at B&BW {pictured at the left end of the top row in all its dirty glory} I have been a firm believer in all of their lines. The best part? I bought that first tube in ninth grade and it still has some juice.

I have no good explanation for the 25 other tubes besides birthdays, Christmas and $3-per-tube sales.


In the end, this collection leads to my lippy stuff box being full to overflowing and hardly being able to fit it on its shelf. And yet I can't bring myself to get rid of any of them. I guess I will forever be a lipgloss pack-rat!

So what's your favorite go-to lipgloss?

I'd love to hear about it!

xoxo
C.R.M.

Thursday, May 17, 2012

Newfound and Nifty

I've found that most blogs have an update that stays constant week to week and I decided to join the band wagon and make one for my own blog. {Maybe it will get me to be more regular in my postings. Ha.}

Inspiration:


I happened upon this Russian designer while blog-hopping and I fell head over heels for her fall 2011 line. {Yes I know it is now summer 2012, but when it comes to vintage clothing, I'd wear it any time of the year.}

Now try not to drool too much as you look at these pics while I get a kleenex to wipe off my chin...


{This one is by far my favorite. Why can't I still have a prom to go to? I would trade this dress for any of the sparkly ones now gathering dust in my closet at home.}


{I have no idea the pricing on any of these pieces, but I'm sure they are all out my range. Now I just need to buy some calico prints to make a full gathered skirt!}


Tunes:


Anyone who knows me, or meets me for the first time and talks to me for five minutes will know that I am completely obsessed with music. I memorize lyrics like crazy and love to belt out my favorites all day every day to the horror joy of my roomies. My current favorites include, but are not at all limited to, the following: 


{I've been checking out Carrie Underwood's new CD on Spotify and I love it! I have yet another CD to add to my birthday/Christmas wish list for this year!}


and last but not least...


Obsession: 

Lipstick. 

Especially anything coral or orangy colored. 

I use to be a lipgloss only type of girl, but lately I have graduated to women's lipwear and I don't think I'll ever go back! {Be watching for a post soon to come about my lipgloss/lipstick collection. I am pretty sure I could never buy another tube for the rest of my life, use up one tube at a time, and never run out.} The fact that I only have to put on a little bit of sparkly eyeshadow, black liner, mascara, and a pop of color on my lips makes getting ready in the morning ten times faster! 

The Fav: I found this gem at Sephora the first time I visited the new shop in City Creek. {Why did I have to discover that I love their make-up so much? I was perfectly content with my four dollar Walmart lipstick until I tried some of theirs.} Now I wear it almost every day!


Projects:


My most resent project has been to finish my first ever digital scrapbook! I ordered the printed book a few days ago and now I am just waiting rather impatiently for the book to show up in the mail!

It took me forever to complete, but I am so proud of it and I hope it prints as well as it looks on my computer screen!


{The book I just completed is of the three Choir Tours I went on during my high school carrer. Such fun times. Above is one of my most resent and favorite pages!}

Well, that's all for today folk and my mom is calling me for dinner! I have loved being at home the past week and having home cooked meals every night that I didn't have to prepare! I'm headed back up to SLC tomorrow as my epic search for a job continues, but I'll miss being home. {And my cat.}

Until next time!

xoxo
C.R.M.

Tuesday, May 15, 2012

Cat Naps

This is what happens when I leave my work station for more than a few minutes...


Too bad she's so cute, I can't even get mad!


xoxo
C.R.M.

...and Maggie

Ruffled Shirt Tutorial


I began making this shirt by using this tutorial...but I ended up taking quite a few deviations. 

My first attempt at finishing off this shirt did not end well. I did the ruffles in a bib shape only on the top...well, it definitely looked like a bib. And a fluffy one at that!

{Sorry I don't have pictures of all the steps, I only decided to make this into a tutorial when the finished product didn't look too wretched!}

Step One: In order to make this shirt, I bought the 3/4 length black shirt to use as the base and a tank top with lace on the bottom and top to cut up and make the ruffles with. {I bought both of these shirts for less than three dollars. If you live in the Salt Lake area, check out the Downeast Outlet Store by Walmart off 1300. Everything in the store is under $10 and you can get super cheap shirts to chop up! It was a bad day for my bank account when I discovered that store!}

Step Two: Cut up the shirt of your choice into strips. I cut mine into 1-2 1/2 inch strips. It just depends on how thick you want your ruffles to be. I snipped the edge of the shirt and ripped rather than taking the time to cut each strip out precisely. 

Step Three: Using a long basting stitch, sew the top edge {long ways} on your fabric strips. Leave the thread ends loose and pull them to gather the strips into ruffles. 

Step Four: Place your ruffles in the design that looks good to you and pin down the top layer. You could work from the bottom up so you don't have to pin back each layer as you go, but I worked from the top to the bottom because I'd rather run out of fabric strips at the bottom rather than the top!


Step Five: Start sewing each layer in place with a stretch stitch {if you are working with knits} by following your basting stitches. Pin back each previous layer as you go so you don't catch it in the next one. Continue in this fashion until you have reached your desired number of layers/ruffles down the center front of the base shirt. 


Step Six: To finish off the top, I did a ruffled flower. I accomplished this by spiraling the ruffled strips until it was full enough. I started on the outside and worked my way in. 

And...Voila! A brand new shirt with some pazazz! 

{Disregard my gross hair and tired eyes in these pictures!}


Some ideas for the next time I do this project:

1: Make the ruffles a little smaller and closer together so the bib idea could actually work. It also wouldn't have looked as fluffy if the ruffles had been out of the same color as the base shirt.

2: Cut the shirt down the middle and make it into a cardigan! My roommate Katie gave me this idea and I think it would look super cute. It would make the ruffles less bold and be more versatile in mixing and matching in different outfits. 

Good luck with your ruffling and let me know what you think!

xoxo
C.R.M.

Monday, May 14, 2012

Taking in Jeans Tutorial

You know what I have always hated? The way that the back of my jeans always pooch out and never lay flat against my back. For some reason my curvy shape doesn't like the fit of the waist band of store bought jeans and I really don't want to undertake the project of making my own. Way too much work when I can find jeans on sale for ten dollars or less {usually}. 

The other thing I hate is wearing belts to fix this problem. This usually leads to the belt riding up and the back of my jeans still pooching out the back. 

So I figured I had two options: 1: Constantly be looking like a fool with my pants on the ground (or at least look like a fool pulling them up every few minutes) or 2: Find a way to fix them.

I went with option number 2. 


Here is the unsightly look of my pants before I took them in. 
{This picture was also very awkwardly taken by looking at a mirror to get the position right while holding up my shirt and trying not to give you all a peep show of my underwear. I'm sure it was quite the show!}


Step One: Put on your jeans and pinch the area between the center belt loop and the side belt loop on either side of the center. You can pin this pinch {or have someone help you pin it} or just eyeball it like I did. Usually I end up taking my pants in about 1/2 and inch on either side. Get too much more than that and your pants will start to pucker funny and they won't lay flat once they are sewn. 


Step Two: Take your pants off {and make sure to replace them with others-or brightly patterned pj pants like me} and find the center point between the middle and side belt loops. If you are taking in pants without belt loops, then fold your pants in 4ths to find all the points you will need to take in your pants. 


Step Three: Match up the belt loops with right sides together. Make sure the top edge is even and if you really want to be precise, that the bottom of the waistband is even too. 


Step Four: Once you have the belt loops and top edge lined up, pull the waistband tight and determine how much you want to take in. You can pin this or once again, eyeball it like I did. 


Step Five: Now it's time to start sewing your dart! {Make sure you are using a jean or heavy duty sewing machine needle.} Sew from the top at your desired width of the dart down diagonally to the decorative seam that is one most jeans along the backside an inch or so down from the waistband. Make sure to backstitch at the beginning and the end of your stich line. 


{Here is a better picture of the spot your dart should be tapering to-the yellow stitching at the bottom of the picture.}


Step Six: You now have a completed dart! Repeat steps 2-5 on the other side of the back of your pants.


{Another example of what the dart should look like.}


This is what the outside of your pants will look like. As you cans see, I wasn't as careful as I could have been with lining up the waistband, but I don't usually tuck in my shirts, so I didn't take the time to be precise. It will also look flatter if iron or even after washing a few times. 


The finished product! I have done this to almost all of the jeans that I own and for those of you who are belt haters {at least for belts that are used as something other than an accessory} I would recommending trying this out! 

{*Note: I don't cut the excess fabric off of my darts just in case I need to take them out at a later date. If your darts aren't too large, they shouldn't affect the way your pants wear or be too bulky and awkward.}


It was hard to get a good picture that didn't make my butt look huge, so this is the best I could do! :) 

Happy Sewing!

xoxo
C.R.M.